
Get started selling products online with our free downloadable workbook.
The email you entered is invalid.
Thank you for subscribing.
By entering your email, you indicate that you have read and understood our Privacy Policy and agree to receive marketing from Squarespace.
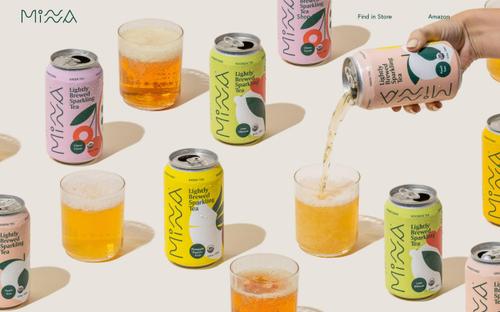
Getting professional-looking product photos is key to your online store’s success. Customers will be drawn to images that accurately represent the products in your online store. High-quality product photos also signal that you’re professional and trustworthy.
You can hire a professional photographer or work with a third-party business to get photos of your products. But with a smartphone camera and some know-how, you can also take good product photos yourself.
Our top product photography tips for beginners include choosing the right product photography equipment, learning how to set up a shoot, and the best ways to edit product images.
1. Choose your photography equipment
To get started, stock up on the equipment needed to take quality product shots. This includes a camera, lighting, a backdrop, and a tripod.
Camera and remote control
A DSLR camera isn’t needed to shoot professional product photography that sells. Since most major smartphones have high-quality built-in camera technology, start there. You can still adjust camera settings like depth of field or shutter speed on a smartphone.
Whichever type of camera you choose, it’s best practice to connect a Bluetooth remote control to it. Using a remote to take product photos makes a difference. A remote eliminates any risk of shaking the camera and cuts down on editing or re-shooting time.
Lighting setup
All great product photos have one thing in common: good lighting. If your product is not properly lit, no amount of post-production editing can help save the photo.
Natural light is a free and common light source for product photography. If you want to keep your equipment simple, set aside a space with good natural lighting for your makeshift photo studio.
If you use artificial light (studio lighting), continuous lighting light sources are best for beginners. What you see through your lens is what you’ll get with continuous lighting. That makes it easier to make adjustments before taking a photo. Continuous lighting:
Stays on throughout a photoshoot
Includes LED lights with dimming mechanisms or incandescent tungsten bulbs
Works best for product shoots of stationary objects
Produces even light wherever it’s directed
Can be modified with photography umbrellas or reflectors
Lighting modifiers like reflectors help to control how light sources soften, bounce, or spill into your shot. They’re important equipment whether you use natural lighting or studio lighting.
Backdrop
A plain white backdrop is the simplest place to start with product photos. If your products are mainly lighter shades, choose a more high-contrast backdrop.
Whichever color you choose, backdrops vary in price, size, and quality. Use a backdrop that won’t crease easily so that wrinkles don’t distract from your products. An ironed, white sheet is a great option.
Tripod
There are tons of affordable options for tripods that can hold your smartphone or camera at adjustable heights. Tripods reduce blur by holding your camera steady. They’re also typically equipped with a built-in bubble level, which takes the guesswork out of eyeballing how evenly you’ve leveled your shot.
2. Set up your photoshoot
Once you’ve gathered the right equipment, it’s time to set up your photo studio. You don’t need a professional photography studio to take product photographs. An affordable lightbox with some white paper, foam board, or another white background can get you a studio lighting effect.
Or simply clear out a spot at home that can accommodate your equipment. As you’re deciding on the space, consider the size of your products, how you plan to light and style them, and the space required for your equipment.
Set up your backdrop
Drape your backdrop so that it sweeps uninterrupted from the vertical plane (wall, back of chair, or free-standing backdrop holder) to the horizontal plane (floor, tabletop, seat of chair). It’s easier to control light and shadow on uninterrupted surfaces, giving you a better product shot.
Once your backdrop is in place, set up your tripod, camera, and one of your products. Frame the product and make sure your camera on the tripod is on a level plane before moving on to the lighting arrangement.
Set up your lighting
Quality lighting is the best way to make sure your product looks accurate and attractive for your ecommerce website. There are two different types of lighting to use for your product photography: studio lighting and natural lighting.
Studio lighting
Studio lighting is best if your products are typically used indoors or have fine details. Consider the number of lights and their distance and angles in relation to the product.
Set up at least three continuous lights from different angles to properly illuminate your product:
One light pointed directly at the product from one side of the camera
A light set up on the opposite side of the camera, aimed as a fill light for the whole product and backdrop setup
A light angled from behind or above the product
Experiment with your umbrellas or reflectors to manipulate the light and shadow to do what you want. The final look should highlight the product and its features while separating it from the backdrop.
Natural lighting
Natural lighting works well for apparel or shots that include people. It’s also a good option if you’ll be photographing in a small space with low ceilings. Small environments can make studio lighting trickier to control.
Instead of setting up multiple artificial lights, set up your backdrop, tripod, and camera by a window that gets bright indirect light. Early morning and late afternoon are the best times of day to take product photos in natural light.
If your only option is to shoot by a window with direct sunlight, hang thin white sheets from the window to diffuse that light so it isn’t as harsh. Just like with studio lighting, use light modifiers to bounce and increase the natural light to fill shadows and best represent your product.
3. Shoot your product photos
Base your shooting style on the types of products you sell and the overall aesthetic of your brand. Here are a few styling and composition tips that will help you shoot product photography for any brand.
Styling your product photography
Contextualize your product with props. For example, if you’re doing food photography, style the shot with table settings or the ingredients used to create that food. For a handmade ceramic mug, photograph it in someone’s hands to show proportions or by props that create a still-life scene of a living room, bedroom, or office. Putting your products in context helps your audience imagine how an item fits into their own lives.
Research the product pages and social media feeds of other brands you admire, especially brands in your industry. These can give you inspiration on how to style or light your products.
Best practices for product photo composition
Next, make sure you’re up to speed on some product photography basics. Get familiar with guidelines about composition and the types of photos to take.
Rule of thirds composition
The rule of thirds is something to keep in mind every time you shoot product photography. For this, imagine your photo as a grid with nine equally sized segments. Your camera might have a setting for this.
The focal point of your photograph should be located along one of the axis points on the grid, where people’s eyes naturally fall. That’s where your product should be set up.
Product variant photos
Never take only one photo. Shoot product photography from several different angles. During the editing process, this will help you choose the best fit for each platform where you’ll share them.
Photos from different angles also help you give a full view of the product to your audience. For example, if you sell shoes, take photos from each side of the shoe and close-up shots of any unique detailing on the shoe.
If you sell multiple versions of the same product, take photos of each style or color. For example, if you sell differently patterned t-shirts in the same style, style and shoot each one of those patterns. You can style them individually or shoot them all the same way.
4. Edit your product photos
Ideally, you’ll shoot product photography that’s close to polished. Your image quality will depend on the quality of your lighting and product photography techniques. But you’ll still need to also learn how to edit product photos to retouch things like white balance.
What you use to edit your photos after shooting is up to you. Powerful desktop programs give you the most editing options but might be more than you need. Start with lower-cost editing apps for your smartphone or desktop and upgrade later if needed. There are plenty of free tutorials for editing product photos in popular photo editing software.
After editing, you’ll also need to update the file types and sizes. Make sure that your file types, sizes, and photo dimensions align with wherever you’re going to showcase your products. Sometimes you might need multiple versions of the same photo for each of the places it’ll show up. For example, something you upload to your website template will need to be cropped for social media.
5. Upload your product photos
Once you’ve shot and edited your product photos and written your product descriptions, you’re ready to launch your products. Add your photos to your ecommerce store, social media, and email newsletter.
With the Squarespace app, you can upload photos directly from your phone to your online store. Remember to optimize the images in your online store by including alt text for the product photos and using strategic keywords in the photo file names.
Squarespace’s Asset Library also makes it easy to access and organize the images you upload. That means you can upload your photos once, file them in a “new products” folder, and pull them for a marketing email, all from the same library.
This post was updated on March 17, 2023.